
MRI Safety
Objectives:
- Define a magnetic field
- Differentiate between Gauss and Tesla
- Define and explain specific absorption rate
- List recommended SAR levels to various body parts
- Define radiofrequency
- Define claustrophobia
- List at least one risk associated with the magnetic field, SAR, etc..
- Explain why there is little data related to pregnancy risks
- List the steps of risk assessment
- Create a list of preventative actions for each of the risks associated with MRI
- Define the 4 zones in the MRI department
- Explain how time, distance, and shielding relate to MRI
- Explain MRSO training and its importance
- Give examples of screening questions used to clear patients for MRI scanning
Description:
MRI Safety is a single course presented in two sections. This course is designed to provide the learner with a more in- depth understanding of the importance of safety in and around the MRI environment. In addition to learning about the risks associated with MRI and methods employed to minimize these risks, the learner will also develop an understanding of the risk assessment process that is used to identify and mitigate the risks.
The MRI Safety course is presented in two sections. Both sections must be completed in order to earn the CE credits available. There is one post-test at the end of the two sections to evaluate learning to award CE credits.
Some of the topics covered in the MRI Safety Course are: Risks associated with the magnet, radiofrequencies, quenches, SAR levels, foreign bodies and contrast media, risk assessment processes, government agencies and the role they play in safety, and the employee/employer role in MRI safety.
Each section lists objectives that will be covered in the module. This course offers interactive learning along with graphics and animations to help the learner understand the material presented. This article is accredited by the CAMRT for 5 Category A CE Credits.
Before discussing MRI safety, it is essential that the history of MRI along with a brief review of the very basic process of how MRI works is needed. This will serve to remind us of the functions of MRI that present safety concerns.
Define MRI
MRI is an imaging modality that has been widely used for over 30 years. MRI stands for Magnetic Resonance Imaging.
MRI does not pose the same safety concerns that come to mind when we think of x-ray, CT or even nuclear medicine. That’s because there is no ionizing radiation used during an MRI scan – which is the primary concern with the other imaging modalities just noted.
MRI does use non-ionizing radiation in the form of radiofrequencies. This use of radiofrequencies poses its own risk which will be discussed.
MRI also uses a very large, very powerful magnet, which poses a very dangerous situation in certain conditions. Again this will be discussed as well.
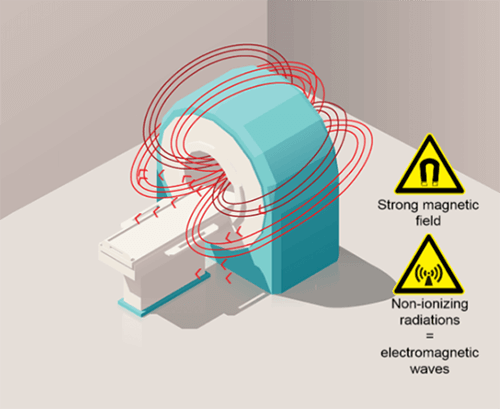
Here we have a typical MRI magnet. The area we see created by the red arrows, demonstrates the magnetic field. The magnetic field is that area around a magnet that possesses magnetization. We cannot see this area when near a magnet, and we cannot feel it, unless we are holding something that is magnetic, or attracted to the magnet. Because we cannot see or feel it, we have to be very cautious about certain things which we will learn more about. It is important to remember that the magnet is ALWAYS ON. Note that the magnetic field is primarily around what is called the more of the magnet and the structure that houses the magnet. That does not mean that the magnetic field does not extend past this area, but it does get weaker the further you are from the magnet, this will also be discussed as we make our way through the course.
In order for us to understand all of the components of safety and potential risks, we must have an understanding of the history of MRI, the basic physical principles of MRI along with technical knowledge of how MRI works. We will also talk a little about legislative and safety standards in this section, but get into it more in section 2.
History of MRI
The very basics of the principles used in MRI dates back to the early 19th century when electromagnetism was discovered. However, it wasn’t until 100 years later, the concept of MRI as we know it today came to light.
1946: Felix Bloch and Edward Mills Purcell describe the Nuclear Magnetic Resonance (NMR) on which is based the Magnetic Resonance Imaging principle.
1969: Raymond Vahan Damadian suggests the use of the NMR in tumors detection (spectroscopy).
1975: Richard R. Ernst suggests using the Fourier Transform for the stage and frequency coding.
1975: 1st image of human tissue by Peter Mansfield.
1977: 1st image of a living human body by R. V. Damadian.
As you may know, X-rays were discovered in 1895. However, it wasn’t until 1946 that the first regulations were established in the United States, regarding shielding and radiation protection. The last X-Rays regulations took around 100 years to be validated
Whereas the clinical MRI was legally used in less than 30 years. Many were skeptical, citing enough research had not been done regarding the safety of MRI.
MRI is a non-radiating imaging technique that is widely used for more than 40 years, and effects of the imaging itself has proven to be safe, under the right conditions.
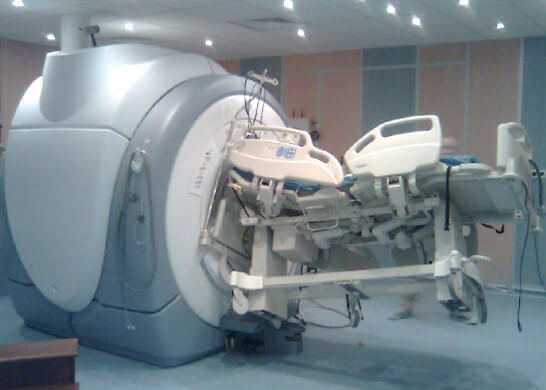
General Principles of MRI
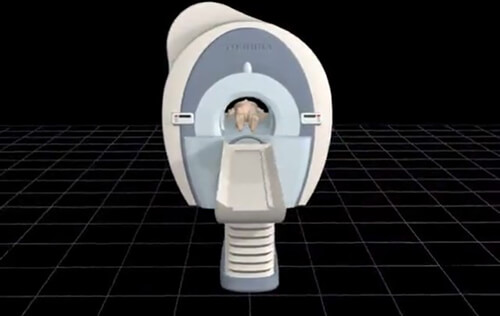
On this image we see the magnet, and the table with a patient. In order to perform an MRI the patient is placed into the bore of the magnet. The purpose of the magnet is to align the hydrogen proton of the body with the magnetic field. Recall from the earlier paragraph, the magnetic field runs through and around the bore of the magnet. What we scan on the patient must be in the center of the bore, however, the entire body is within the magnetic field. I say this because a misconception is that if a part of the anatomy is outside of the bore, it is not subjected to the magnet and the dangers associated with the magnet. Take a pacemaker for instance. Some think if the chest is outside of the magnet and the knee is in the center, the magnet will not affect the pacemaker.
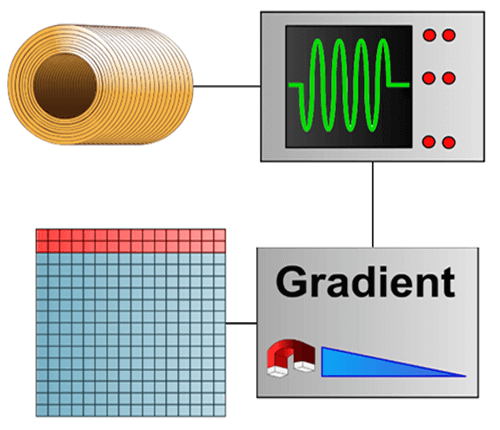
This is a highly schematic image that breaks down the mechanism. An RF (radio frequency) wave is emitted, a signal is detected and the use of gradients enables this signal to be used to fill the mathematical space called Fourier space or K space.
Once the K space is filled, we apply a mathematical formula (double Fourier transform) in order to obtain an image. The Fourier space is the frequency representation of the image.
The general principle of MRI can be described in a simple manner with a magnet, a radio frequency wave, and a signal that is detected, localized and processed by the use of gradients. This signal is used to fill a mathematical space called the Fourier space. We thus obtain an image using a mathematical formula.
- Permanent magnets – which are sometimes called vertical magnets (not very expensive, weak magnetic field, weak homogeneity)
- Resistive magnets (expensive, weak magnetic field, good homogeneity)
- Superconducting magnets (expensive, high magnetic field, good homogeneity)
Given their features, the superconductive magnets are currently the most commonly used.
Importance of Homogeneity
The MRI magnets used must be as homogeneous as possible. If the homogeneity is not ensured, the system will malfunction and the images created will not be useful.
Homogeneity is defined as the uniformity of the magnetic field from the center of the magnet. Homogeneity is measured in ppm or parts per million, from a certain diameter from the center of the magnet. For example, an efficiently working scanner might have a homogeneity of <1 ppm over a 40 cm diameter.
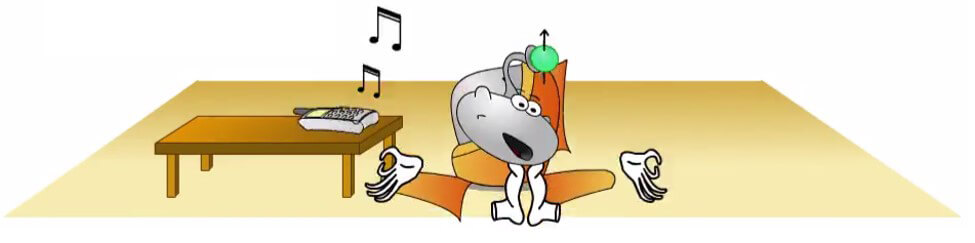
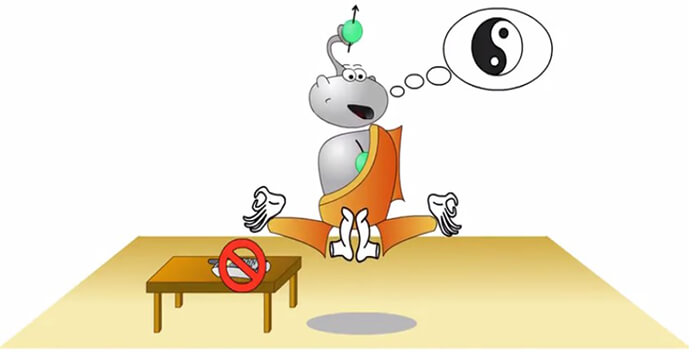
In this image the character (Hydro) represents the spin of the protons, and needs peace and quiet to get into meditation, much like way the scanner needs homogeneity.
If something is disturbing as the sound of the phone, it loses its homogeneity and cannot get into meditative state. Open magnets have poor homogeneity.
On the other hand, one of the advantages of a superconductive magnets is that it allows obtaining good homogeneity magnetic fields that may be used in MRI.
Now, here the spin is not disturbed by the phone ringing. Hence, these types of scanners are frequently used to create the main magnetic field especially in scanners over 0.5 Telsa in strength.
Superconducting Magnet
The superconductive magnet uses a coil composed of an alloy and that is immersed in liquid helium. It is based on the principle of Ørsted that is used in resistive magnets with the addition of the principle of superconductivity.
Superconductivity was discovered by Kammerlingh Onnes in 1911 when he chilled metals in liquid helium down to a temperature of about 4 degrees Kelvin. He demonstrated the loss of resistivity of a material when it was cooled below a certain point, called the critical temperature.
Alloys currently used have a very high critical temperature (140°K), much higher than the temperature of liquid helium. This explains why it is now much less expensive to obtain superconductors.
When the magnet is placed in the helium bath, a current is injected in the circuit and then circulates without resistance, providing a constant and intense magnetic field.
The first property related to safety in MRI is the very powerful magnet. The magnet creates a magnetic field. Recall that anything attracted to a magnet will be attracted to the magnetic field. This type of magnet can provide very high intensities. It is commonly used in clinical MRI once intensity exceeds 0.5 T.
To put this into perspective, a typical magnet for a refrigerator is 100 gauss. I am sure we have all had experience placing a magnet on a refrigerator or a metal file cabinet. Now, consider that there are 10,000 gauss in one tesla!!
This means that a 1 Tesla MRI scanner has a magnet that is 100 times stronger or more powerful than the refrigerator magnet. The fact that the size of the magnet plays a role as well is another consideration. The MRI scanner is thousands of times larger than an average refrigerator magnet.
Now let’s take the time to further define some terms associated with MRI safety, then we will discuss the safety concerns with these terms.
We have already discussed magnetic field, but in this next section we will further define the term and area of the Magnetic field. We will talk more about Gauss and Tesla, and learn about Specific absorption rate, claustrophobia, radiofrequencies Quench and define the term risk.
Magnetic Field
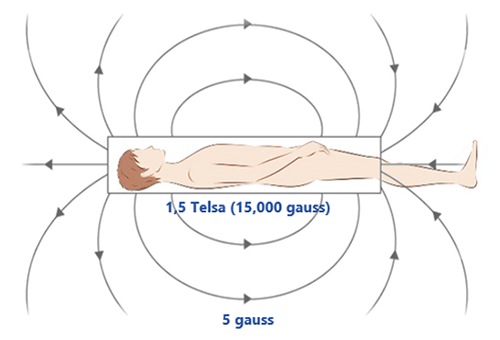
MRI uses static magnetic field of high intensity (usually 1.5 to 3 Tesla). Two zones of magnetic field must be distinguished:
The first is located around the isocenter of the magnet inside the winding of coil surrounding the magnet: this is the tunnel space of the machine, otherwise known as the bore. In this zone, the magnetic field is intense and fairly homogeneous.
The second area corresponds to the magnetic field outside the magnet. The intensity of the magnetic field varies according to the position with respect to the center of the magnet. It decreases gradually with the square of the distance.
The magnets are self-shielded. Therefore, the magnetic field strength decreases rapidly as the distance increases.
The line of 5 gauss (= 0.0005 Tesla) is recognized as the safety limit not to be crossed. This line should not be crossed by patients with contra-indications or ferromagnetic objects.
Gauss Lines
All scanners have a specific gauss map or zoning. In some MRI rooms, the line of 5 Gauss and possibly the 1 Gauss line will be marked on the floor. This is not always the case. It can be dependent on laws and regulations in a given state, but it is the recommendation. However, all scanners installed have a map available to show users where the 5 gauss line is located. The markation is important, the 5 Gauss line is the line that determines the safest place in the room in regards to the magnetic field.
Here we see various images of the gauss map while looking at the scanner from various perspectives.
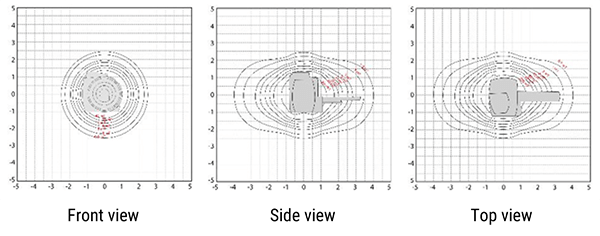
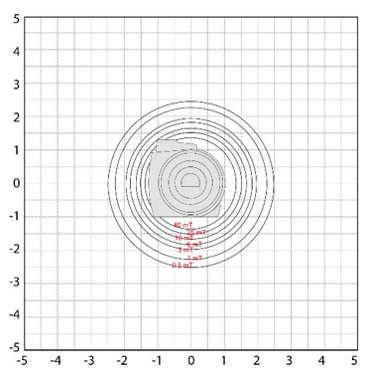
On this image we are looking at the scanner from the front. Imagine standing at the end of the table looking into the bore of the scanner. The grid is marked in Gauss. The magnetic field in this view is extending toward the ceiling, the floor and to the left and right of the scanner. In these directions, the magnetic strength does not get above approximately 2.5 Gauss for this particular scanner. Always remember, these maps are not interchangeable. There is a specific map for every scanner.
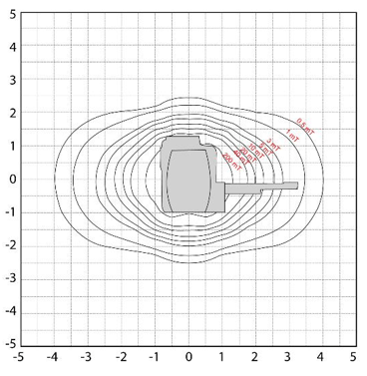
Now, on this map we are viewing the scanner from the side, so imagine standing to the right or left of the scanner looking at it.
Note here, we can still visualize the magnetic field going towards the ceiling and the floor, but we can also see the field towards the table end of the scanner, and out away from the scanner in the opposite direction.
Note how much further the magnetic field extends in these directions!! This is important. One may not feel something pull towards the scanner if standing to the side or below the table, but if that same object was towards the head or foot of the table it would be a much more powerful pull.
The magnetic field in the head to foot direction is approximately 4 Gauss.
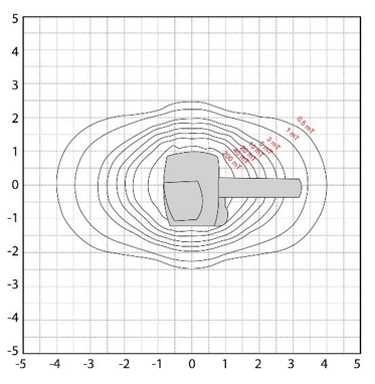
This image shows the view from above the scanner. Again, we can see the extent of the magnetic field from head to foot, but this time we see it with the magnetic field to the left and right of the scanner. Again note, the magnetic field in Gauss from head to foot is almost twice that of the left to right field.
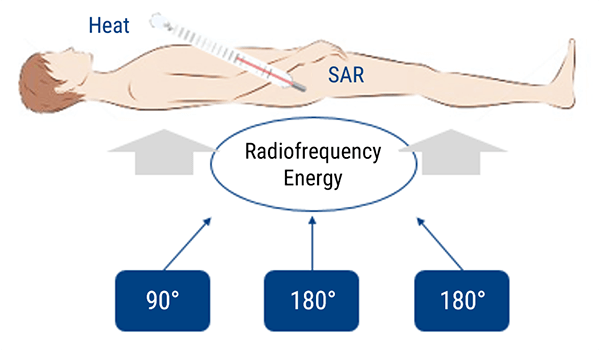
SAR: Specific Absorption Rate
The next term to define is SAR or Specific Absorption Rate.
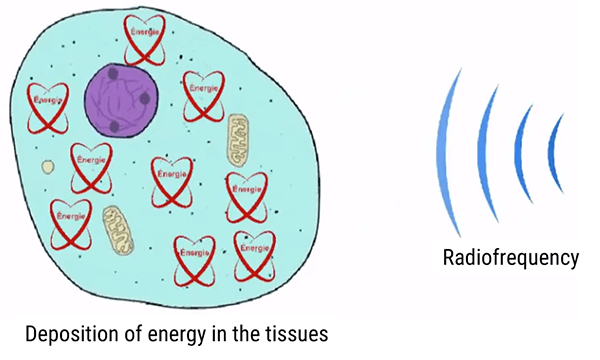
During an MRI Radiofrequencies are transmitted to cause the protons which are aligned with the magnet, to turn away for that magnetic field influence. The laws of physics tell us that energy cannot be created or destroyed. For this reason, the energy has to be deposited somewhere.
The water molecules inside the human body will move proportionally to the quantity of energy transmitted to them. This molecular agitation is the source of tissues heating.
This absorbed energy is measured by the coefficient of specific absorption called Specific Absorption Rate (SAR). SAR is defined as the quantity of energy transmitted to the patient. It is expressed in W/kg.
This measure is based on the weight of the patient and the different parameters of the used sequences. For this reason, it is important not to overestimate or underestimate the weight entered for each patient while the data is registered.
In clinical applications, 2 levels of SAR are acceptable. The normal mode and first level mode. We will discuss this further later when we discuss risks associated with these safety issues.
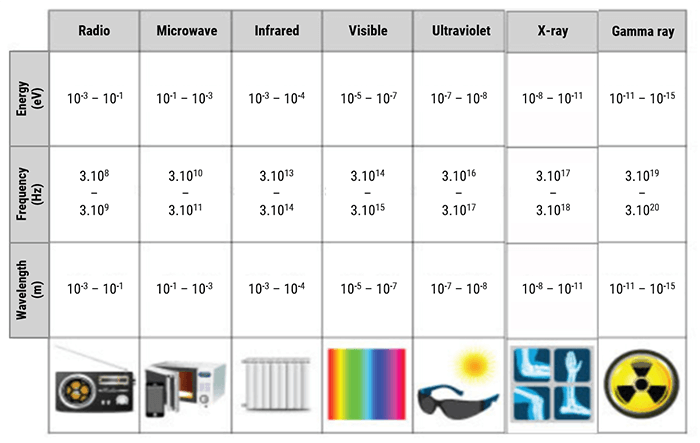
Radiofrequencies are a form of energy found on the electromagnetic spectrum. All energy on the electromagnetic spectrum are a wave form, which is characterized by it frequency range. On the electromagnetic spectrum, frequency refers to how many waves occur in a given space of time.
On this chart, we can see all of the different ranges on the spectrum. Note that the radiofrequencies are at a much lower energy level compared to the energy level of x-rays. Recall, x-rays are ionizing, which means they are of an energy level high enough to cause biological damage. Radiofrequencies are not ionizing, but they are, by definition, radiation.
| Electromagnetic Waves | Frequencies | Application |
| X-Rays | > 3000 THz | Medical imaging radiography |
| UV Rays | 750 THz to 3000 THz | Sunbed |
| Visible light | 385 THz to 750 THz | Human vision, photosynthesis |
| Infrared | 0.3 THz to 385 THz | TV and FM radio |
| Radiofrequencies | 30 KHz to 300 GHz | Heating |
| Very Low Frequencies (VLF) | 3 KHz to 30 KHz | Radio communications |
| Audio frequencies | 0.3 KHz to 3 KHz | Voice data transmission |
| Earth magnetic field | 0 Hz (continuous) |
Here we have another chart showing the various energy levels of some of the electromagnetic spectrum. As you see, Radiofrequencies range from 30 KHz to 300 GHz. The first type of wave that is ionizing is the UV rays, which are much more powerful. Ionizing radiation is found above energy levels of 750 THz.
MRI uses radiofrequency pulses to flip the spins into the transverse plane in order to receive a signal. These pulses are part of the radiofrequencies ranging between 30 KHz and 300 GHz, because they have to be in the same range as the precessing frequencies of the protons.
When the radiofrequency is applied, it causes the protons to move from the steady state experienced in the magnet. We do not want to get too deep into the physics of this process in this course. But understand that a good bit of energy is imparted into these protons during this process. Part of the energy flips the protons, and the rest becomes heat, which as we have learned, affect SAR levels.
Radiowaves come from other sources, such as television and radio transmission. These radiowaves can impact the MRI process. Radiowaves from the scanner can also affect things outside of the MRI room. For this reason we have a Faraday cage. The Faraday cage allows the isolation of the examination room from a radiofrequency perspective. The external waves cannot enter. Likewise, the waves emitted by the MRI system cannot leave the examination room.
Claustrophobia
Claustrophobia is defined as an extreme or irrational fear of confined places. If you have ever seen an MRI machine, you understand why this can be an issue. Claustrophobic patients pose very specific safety issues, which we will review shortly.
Quench
A quench is defined as the sudden loss of superconductivity when its temperature is raised. In a normally functioning superconductive scanner, helium is used to cool the coil.
The quick exhaust of helium (quench) implies a warming of the coil. The coil become resistive, the current flowing over the field stops. But, more importantly, the helium, which should be evacuated from the room through exhausts, will begin to fill the room. This is what poses the greatest safety concern.
It should be noted that a quench can be initiated by an MRI worker, or it may happen accidentally. Again, more on the specifics of the safety risks but for now, just understand the definition.
Risk Definition
The last term we need to define is risk itself. As a noun, risk means a situation involving exposure to danger. As a verb, risk means to expose someone or something to danger, harm, or loss.
In MRI, we have many risks in the form of situations, which involve exposure to danger, both for staff and patients. However, it is our duty to ensure that we follow standards and precautions set in place to avoid exposing these people to danger or harm. The second section of this course will focus on how we do this. But to move forward in this section, we have to understand what risk is.
Now that we have defined essential terms, let’s look at all of the safety issues in MRI, and the risks associated with safety concerns.
Please note, with all safety concerns, it is important to follow the policies of your institution and refer to the MR safety officer or specialist OR refer to manufacturer’s recommendations.
Magnetic Field Risks
The Magnetic Field poses the greatest risks in MRI. This is because the magnetic field can create deadly situations. MRI is a very safe imaging modality but if the wrong situations exist, it can be very dangerous.
These videos show the dangers of magnetic attraction in MRI. Every ferromagnetic object, as small as it may be, can be attracted to the magnet at high speed. Most accidents in MRI are due to objects forgotten in pockets.
In the first video, we see the effect of magnetic attraction on small objects (stethoscope, pen). We can see that for the pen, only the spring is ferromagnetic and its mass is low compared to that of the pen. Even so, it is sufficient to attract the pen to the magnet.
Take a moment to watch the video.
Here is another video showing the projectile effect. As the ferrous oxygen cylinder is moved closer to the magnet, you can note the moment the magnet takes hold of the cylinder and drives it into the open bore.
There was a very serious case in recent history, where a 5 year old child was inside the scanner, when a situation like this occurred. Unfortunately the child did not survive the accident.
Take a moment again to watch this video.
Here we have a video made available by Sahlgrenska University Hospital. This video shows a watermelon in place where a patients head would be. A ferrous oxygen tank is brought into the room and introduced to the magnetic field. Take a moment to view this video to see what happens to the watermelon.
This Video is also provided by the Sahlgrenska University Hospital of Goteborg in Sweden and shows us the power of attraction of a 1.5 T magnet over a bed that is not MRI compatible. For more realistic conditions and to show the power of this attraction, a watermelon has been placed in position to represent a healthcare provider who will stand between the bed and the magnet.
Another important concern around the magnetic field are implanted devices or medical devices implanted inside the patient.
Issues with implanted devices are overseen by the FDA (Food and Drug Administration) and ASTM (American Society for Testing and Materials). The ASTM set standard for classifying implanted devices as:
MR Safe – an item that poses no known hazards in all MRI environments. Using the new terminology, “MR safe” items would include non-conducting, non-metallic, and non-magnetic items. An item may be determined to be MR Safe by providing a scientifically based rationale rather than test data.
MR Conditional – an item that has been demonstrated to pose no known hazards in a specified MRI environment with specified conditions of use. Field conditions that define the MRI environment include static magnetic field strength, spatial gradient, dB/dt (time varying magnetic fields), radio frequency (RF) fields, and specific absorption rate (SAR). Additional conditions, including specific configurations of the item (e.g., the routing of leads used for a neurostimulation system), may be required.
For MR Conditional items, the item labeling includes results of testing sufficient to characterize the behavior of the item in the MRI environment. In particular, testing for items that may be placed in the MRI environment should address magnetically induced displacement force and torque, and RF heating. Other possible safety issues include but are not limited to thermal injury, induced currents/voltages, electromagnetic compatibility, neurostimulation, acoustic noise, interaction among devices, and the safe functioning of the item and the safe operation of the MR system. Any parameter that affects the safety of the item should be listed and any condition that is known to produce an unsafe condition must be described.
MR Unsafe – an item that is known to pose hazards in all MRI environments. MR Unsafe items include magnetic items such as a pair of ferromagnetic scissors.
Beware, some of these devices are not compatible except for a determined value of fields and for specific sequences, for more information, check the compatibility with the help of MRI safety website.
- Absolute, which means they prevent the examination from occurring
- And Relative, which mean the risk involved will interfere with the execution of the examination
Now let’s go through and look at some of these individually.
Movement of foreign metal objects inside the body
Devices inside the body pose various types of risks. We discussed devices that are medically implanted. But these risks also include metallic foreign bodies.
The risk of movement or heating of the implant of foreign body is a very serious risk. Remember, the magnet can and will have an effect on any material attracted to the magnetic field/known as ferrous material. When introduced to the magnetic field it can cause these items to move, or torque or twist. A metal foreign body in the eyes can result in blindness. An intracranial vascular clip can pose a hemorrhage risk in the brain.
In addition, even if not ferrous, metals can act as a heat conductor and cause damage to a vessel or organ.
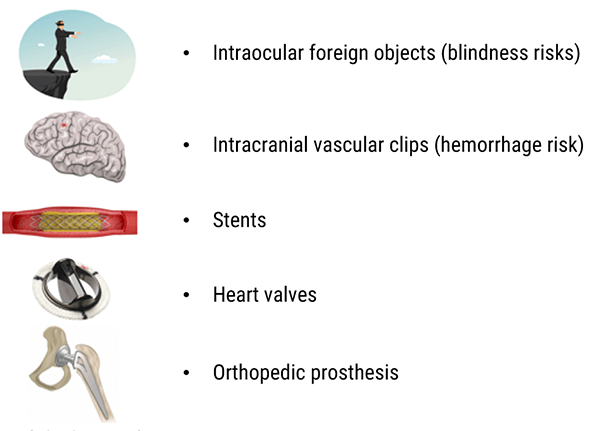
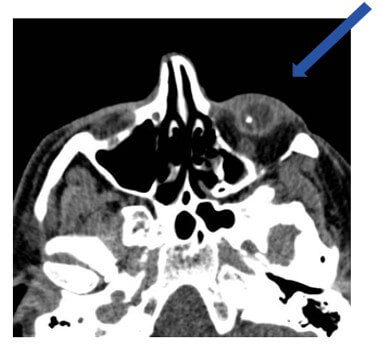
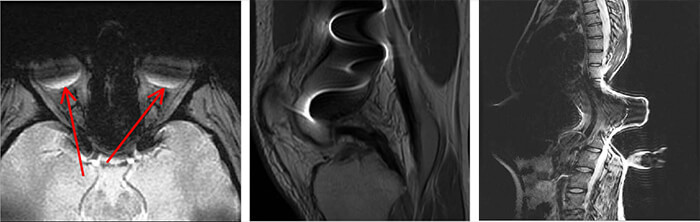
Intraocular foreign objects (blindness risks)
As mentioned we need to be concerned about metal in the eyes. Here we see a CT scan of the orbits, most likely done to r/o an intraocular foreign body. Luckily this was seen before the MRI was performed.
Intraocular metallic foreign objects are common in people working with metals, such as welding or grinding metals. These metals could cause blindness by vitreous hemorrhage or retinal tear.
A patient would not necessarily know that they had a foreign body in their eyes. If the metal is deep in the orbit, it isn’t necessarily felt. However scar tissue does not form in the orbit like it does in other tissue, so the metal can be easily moved by the magnet. (source AFNOR 02/2012 editions)
Patients should be screened for possible metal foreign bodies, if they are at risk, further investigation is needed. All imaging centers have different policies. Some require orbit x-rays on every patient. If metal is suspected, one would determine if prior CT or x-rays have been done, if not the radiologist or MR safety officer, would ask for orbit CT or x-rays.
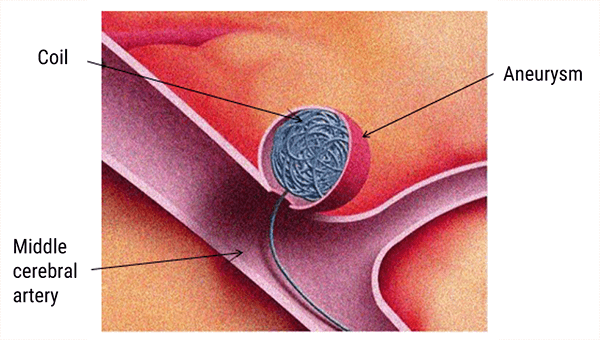
Vascular intracranial clips (hemorrhage risk)
Prior to around 1984, the metals used for aneurysm clips were made of ferrous or partially ferrous metals. Some were made of material that heated during exposure to MRI radiofrequencies. The old intracranial vascular clips could be the cause of vascular lesions and hemorrhage.
The recent vascular clips are compatible with MRI and are usually made of titanium. (source AFNOR 02/2012 editions)
For more information check the compatibility at www.mrisafety.com or in the MRI safety manual published annually. In addition, patients with implants will have a card with a serial number. This number can be checked at the manufacturers’ website for MRI safety information.
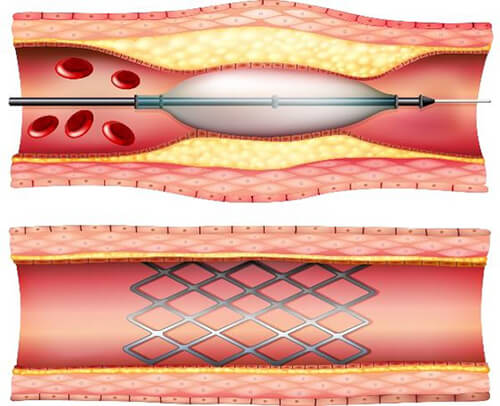
Stents
Nitinol or titanium, non-ferromagnetic stents could be examined by MRI immediately after being placed.
Other stents are slightly ferromagnetic. It is recommended in this case to wait 6 to 8 weeks before the MRI, thus allowing a granulation tissue is formed and definitively immobilizes the stent inside the vascular wall. (source AFNOR 02/2012 editions )
Again, the specific safety information of specific stents can be checked at the www.mrisafety.com website or in the annual MRI safety manual, or at the manufacturers’ website.
In this example, some stents may be scanned on a 1.5T or 3T scanner. This means that the particular stent has been tested on these scanners and under these conditions. As we see here, Maximum field strength for this stent is 3T. The spatial gradient field has to be below 720 Gauss/cm and the SAR level must be kept below 3 W/kg for a maximum of 15 minutes.
This is a great example of the types of specific conditions that may be listed for medically implanted devices.
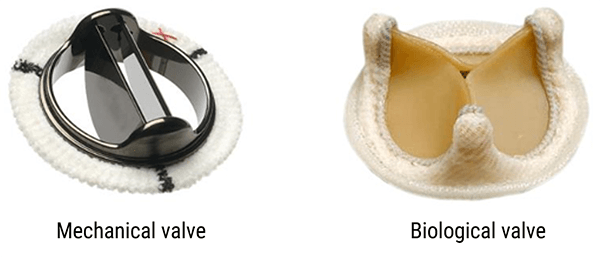
Heart Valves
The old heart valves, which were mechanical valves, could be ferromagnetic. The new heart valves, both mechanical and biological types, are MRI compatible.
Lists of incompatible and compatible valves are regularly updated. You can see them on specialized websites like www.mrisafety.com, the MRI safety manual or the manufacturers’ website. (source AFNOR 02/2012 editions)
Orthopedic prostheses
The orthopedic prosthesis and osteosynthesis materials such as screws, nails, plates, and pins, are solidly implanted in the bone.
In the worst case, the image will appear with artifacts around the implanted device. A period of 6 to 8 weeks post-surgery, maximum is recommended in order to avoid the material move. Other materials (titanium and its alloys, nitinol, tantalum…) are not ferromagnetic.
Overall, prosthetic devices used in orthopedic work, do not pose a great risk, however they will degrade image quality. Here we have a few images to show the artifact cause by metal. Metal can create a void in signal and it can distort signal.
Image 1: here we have an MRI of the orbits. There is some kind of metal present, as we see the void area through the orbits anteriorly and near the back of the globe. This is most likely from prosthetic eyes.
Image 2: This MRI image is of the spine, with metallic screws in place. Note the massive distortion to the image, along with the black void within the distortion.
Image 3: Here we have a lateral view of the spine. Again we note a large area of distortion of the signal and thus the image.
Disturbing the functioning of some equipment
Another risk of the magnetic field is its interference or disruption of the functioning of some equipment. The magnetic field can cause equipment to become deactivated, deprogrammed or even heat up the devices. The magnetic field alone does not cause some of these issues, at times it is the radiofrequencies or a combination of radiofrequencies and magnetic field.
Some examples are: Pacemaker, insulin pumps, nerve stimulators, cochlear implants or bypass valves.
It is also not important enough that a patient had one of the devices removed. It is essential to ensure that all components of the device were removed, because of the fact that it is NOT always about function, but also about the possibility of heating.
Cardiac pacemakers and defibrillators are contraindicated in MRI. A pacemaker is placed in the upper left side of the chest or in the abdomen, just under the skin, with leads going into the heart. The pacemaker itself has a battery, and the leads have a small metallic tip. Both aspects pose great risks in a magnetic field.
There are pacemakers in production now that are MRI safe, however even they have to be scanned under very specific conditions only.
Insulin pump
Some diabetics have insulin pumps attached to their abdomen. Most of the insulin pump is plastic and is MRI safe. However the pump itself and the battery pack pose a risk. This component is easily removed and left outside of the room, and the patient can be scanned without incident. However, it is always best to let the patient know if they feel anything abnormal to alert the technologist immediately.
Nerve stimulant
Nerve stimulators are also of concern. Most are contraindicated, even if they are no longer functional. These devices pose potentially hazardous or fatal Results. Some examples are neuro pain stimulators, bladder stimulators and some penile implants.
Cochlear implant
Cochlear implants, which are a specific type of implanted hearing assistive device, have multiple components. The first part is the implanted signal emitter is MRI conditional, therefore specific manufacturer conditions must be followed. Next there is a magnet implanted under the skull that will hold the external component in place. This magnet is also MRI conditional. Last is the external component, which attaches to the magnet in the skull and wraps behind the ear. This portion of the device can be removed and kept out of the room. It is recommended to remove this right before entering the room – so that the patient can hear all screening questions and instructions.
Patients should be instructed to inform the technologist if any strange warming or other sensations are experienced. In addition, patients with cochlear implants should NOT move in a direction perpendicular to the main magnetic field.
For example – on a horizontal field magnet of a superconductive scanner, the patient should roll to the left or right, not sat straight up.
Ventricular drain
Ventricular drains are placed in patients with hydrocephalus, to drain the excess fluid from the ventricular system. The very tip of the tube contain a metal tip, to help identify the drains on x-rays and CT scans. The drain consists of plastic tubing under the skin, extending down into the peritoneal cavity, the excess fluid is transmitted to this cavity because fluid is more easily absorbed by the body there.
The majority of this system is MRI safe, the others are MRI conditional.
Risks associated to the magnetic field are many. Let’s review what we learned on this subject.
For all implanted medical devices, especially electronics, references and dates of implementation along with the manufacturers’ recommendation must be checked and cleared with the appropriate person at your facility.
Referring to reference manuals with regards to MRI safety must be a part of the process. Some examples are the Guerbet booklet, Shedlock’s manual for MRI safety or www.mrisafety.com website.
The MRI technologist, radiation safety officer or radiation safety specialist or the radiologist should be consulted in any case of doubt about the safety or conditions of an implanted device. And be sure to always follow the policies at your facility.
Recall earlier, we learned that part of all of the energy from the radiofrequencies is deposited in the tissue and may lead to the overheating of the tissue.
The radiofrequencies come from outside the anatomy, but have a direct effect on the protons within the body, particularly the hydrogen protons. This radiofrequency energy is converted into the kinetic energy to flip the protons and heat energy.
Because this energy needs somewhere to go, certain items or conditions will provide the opportunity of the heat or energy to be deposited. This situation can result in burns to the skin or organs, called RF burns.
Some examples are cables or IV tubing touching the patient’s skin directly. Electrode patches, some medication patches and even the coil can pose a risk if touching the skin directly. Moisture in the folds of the skin, or moisture from a wet diaper will also provide such a source.
Also the contacts between multiple cutaneous zones: crossed hands or hands on thighs, contact between the thighs. And let’s not forget about metals which may act as conductors in jewelry and metals in tattoos or permanent makeup.
A good rule of thumb, is to leave outside the room what can be left outside the room and away from the body. And if it must be in the room, provide a barrier between the item and the skin.
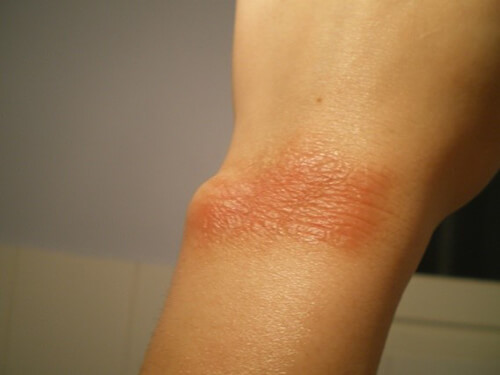
In MRI, a burn can continue to get worse over time. A patient may have a first degree burn right after the incident, which will later present as a third degree burn. Think of sunburn – they look worse a few hours later.
Skin burns
Here we see an example of a burn caused by a coil.
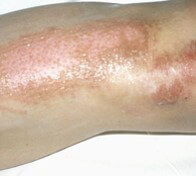
It is important to well isolate the patient from any contact with antennas cables, the bore or any skin to skin contact. Having long scrub pants on, the use of MRI sponges or wrapping the knee in a sheet, would reduce this risk from coils or cables/wires in this particular case.
The inside of the bore requires a bit more distance or padding, it is standard precautions to provide a minimum of 10mm of distance or padding between the body part and the bore. Therefore, a sheet or even clothing is not enough protection when against the inside of the magnet.
Some other things we can do is to make sure the cables and wires run parallel to the magnetic field, and that there are not touching loops of cable or wire.
SAR Related Risks
Radiofrequency related risks are directly associated with SAR related risks. Recall, SAR means Specific absorption rate.
The MRI machine calculates the SAR for each sequence based on the weight and height of the patient (which the operator enters when registering the patient) with a maximum limit of 1 to 2 W/kg, which provides a wide margin of security. (Source AFNOR 02/2012 editions)
Hence, it is important not to under or overestimate the weight and the height of the patient.
The FDA, or Food and Drug administration, in the US defines some SAR limits for various studies. Note, the FDA can only regulate equipment, it can only make suggestions to individuals or other regulatory agencies.
According to these limits, manufactured equipment should operate in such a way that the SAR limit given is not reached during the time listed. For example, for a Head MRI, the SAR should not exceed 3 W/kg over a 10 minute period. It is usually acceptable if one or two sequences are above the limit as long as they are not 10 minutes long.
The FDA also requires that equipment notify the operator if the SAR limit will be exceeded. Again, if it is only 1 or 2 sequences, most will accept the higher SAR limit if the total time is not exceeded.
The primary parameters controlling SAR are TR – Time to repetition, TE – Time to Echo, Flip angle, ETL or echo train length, number of slices and magnetic field strength.
Quench Related Risks
As we know, a quench is caused by a release of helium, which results in the warming of the superconductive coil. A quench can occur in one of two ways. Either spontaneously, or it can be activated by the operator.
A spontaneous quench has risks because it is caused by a leakage of the liquid helium. As the room fills with gaseous helium, it will replace the oxygen levels which creates air that is dangerous to breath. In addition as the room fills, it can create a seal at the exit, preventing those inside from leaving. It can also result in frostbit if the cool gas comes in direct contact with skin.
However, an activated quench is used in a case of a life-threatening situation involving a patient or staff member, or a fire. The quench will cause the scanner to lose its magnetization, therefore if someone is trapped against the magnet by a ferrous object, the quench will allow the connection to be released. As far as fire, a quench will allow fire fighters to enter the room to put a fire out, without worry that the equipment they use will become dangerous projectiles.
This clip is taken from a film used by the manufacturer to make maintenance technicians aware of the hazards of MRI machines.
We see a factory quench, that among other things shows the volume occupied by helium once in the gaseous state. The size of the gas cloud is placed in perspective with the size of the person behind it in the video.
An MRI in operation contains about 2000 liters of liquid helium. When in the gaseous state, its volume is about 720 times greater, about 1,440,000 liters of gas.
Even though evacuation ducts are in place, some helium may escape into the examination room. This may create a positive pressure preventing the room door from being opened if it swings toward the interior. This is why the doors of MRI rooms without an automatic air extractor open toward the exterior.
This clip shows a quench when an MRI machine is replaced. It shows the volume of gas released again so that you can appreciate the amount of gas involved.
It also shows that some helium in the liquid state always remains when an MRI machine is moved. This video was obtained from an on-line video sharing site.
Here we have an image that shows frost bite from the very cold gas released during a quench. There is a serious risk of both asphyxia and frost bites for the patient in the tunnel and eventually for the staff in the room. (Source AFNOR 02/2012 editions)
There is also a risk of the room containment: the overpressure induced by the serious helium leakage might make impossible to open the door if the door opening is towards the examination room. (Source AFNOR 02/2012 editions). 1 L of liquid helium will be transformed into 700 L of helium gas.
What should one do, the event of a quench?
First evacuate the room and the general environment. After everyone is out of the room, close the door. Next increase the ventilation if possible and immediately notify the manufacturer.
Noise Related Risks
The noise we hear in MRI comes from the gradients. Gradients are responsible for the linear and symmetrical modification of the main field, that can be turned on and off very quickly, producing a characteristic sound on running machines.
This noise is very loud. The more powerful the gradients, the louder the noise produced. Some vendors have developed ways to try to insulate the noise, but even scanners sold as “quiet” are not what we would think of as quiet, you definitely couldn’t operate one in a library and get away with it.
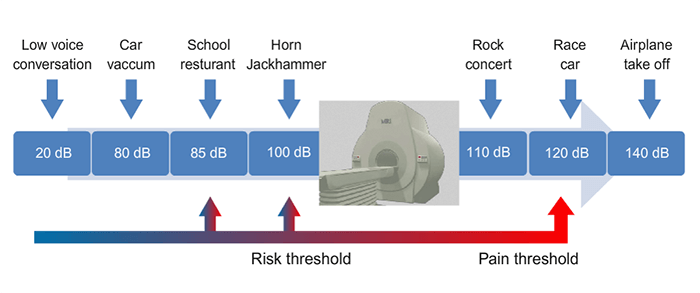
Noise is measured in decibels or dB. At over 100 dB, there is a risk to the hearing of the person exposed. OSHA requires hearing protection when exposed to 85 dB or more.
Note where the MRI scanner falls on this scale. A jackhammer operates at approximately 100 dB, with MRI not far above it. This should be explained to patients who do not like to wear the hearing protection. As always, department policy should be followed, but it is not uncommon for hearing protection to NOT be optional.
Hearing protection comes in different forms. Headphones or in-ear buds providing music are acceptable as are earplugs and unconnected earphones.
For most manufacturers, the noise produced inside an MRI is usually limited to 99 dB. In some cases it could reach 114 dB with rapid sequences and echo-planar sequences (EPI).
- Increases the patient’s anxiety
- Makes the examination uncomfortable
Generally speaking, excessive noise could cause hearing loss or difficulties. Therefore, it is convenient to protect the ears of the patients with ear and hearing protectors that could reduce sound levels to 30 dB. The limit of noise exposure is 87 dB for workers.
Contrast Medium Related Risks
Contrast media, in the form of Gadolinium for MRI, is given to patients in approximately 1 of every 3 examination.
Most often, it is in the form of an IV injection of a paramagnetic pharmaceutical agent which alters the T1 relaxation of some tissues in order to improve the contrast.
In a healthy person, it will be eliminated by the kidneys. In recent years, it has been realized that patients whose kidneys are not functioning properly, are at risk for a condition called NSF, or nephron-systemic fibrosis.
Contrast is most often given as an injection, so risks associated with intravenous access, such as extravasation, phlebitis and infection are to be considered.
In addition, some patients will have a hyper-sensitivity or allergy to these contrasts. Injections of contrast, like any medications, are not without risks or undesirable effects. On the following paragraphs, we will explore three of the more commonly talked about effects.
Extravasation or the escape of the contrast from the blood vessel into the surrounding tissue.
Hypersensitivity reactions which are further divided into degrees of severity, and NSF or nephrogenic systemic fibrosis.
One other possible risk, which we will not discuss in detail because it is still being researched and studied, is the retention of contrast in brain tissue. This needs to be researched further in order to be able to understand it further.
Let’s look at each of these individually.
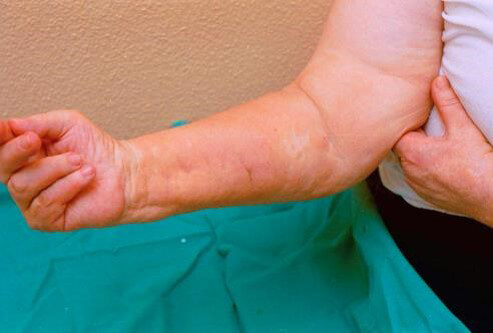
Extravasation
Extravasation is defined as the escape of fluid from a vessel into the surrounding cutaneous tissues.
Extravasation occurs in less than 1% of all injections. It is more common when pressure injectors are utilized. And it is a much greater risk with patients who have weak vessels.
Most of the time, extravasations do not pose much of a problem. The technologist, when injecting, will stop the injection the moment the patient experiences symptoms of extravasation. These symptoms include, swelling, pain, and redness at the injection site. These can be treated easily with warm/cold compress on the site alternately. This helps the contrast to be absorbed into the tissue.
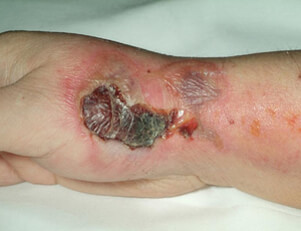
In very rare cases, more severe complications occur, such as blistering of the skin, sloughing of the skin and scarring requiring a skin graft.
The recommended sequence of events, should an extravasation occur, are listed above.
If an extravasation is noted, stop the injection immediately. The next step is to determine how much contrast extravasated, and documenting this amount. If possible try to extract or aspirate the product (this is not often possible). The affected arm should be elevated. Then the cold/warm compresses should be applied.
Be sure to explain to the patient what happened, and provide follow-up instructions for care. All cases should be documented in the patient’s chart or reported to their physician.
At a later time, the site can be evaluated, but within 24 hours. Most cases will involve a small amount of contrast, as contrast is injected in small amounts in MRI. Because of the small volume, the contrast will reabsorb easily.
Hypersensitivity Reaction or Hypersensitivity Response
Hypersensitivity reactions to contrast are rare, occurring in less than 1% of patients. Some resources will refer to these as responses rather than reactions, because many think that a reaction is something NOT expected. Some responses are expected to occur and are self-limiting, meaning they go away on their own.
Hypersensitivities are divided into two classifications: Allergic Hypersensitivity and Non-Allergic Hypersensitivity. The most basic difference is: Allergic Hypersensitivity involves histamines being produced by the body and non-allergic do not.
To further analyze these, allergic reactions can occur immediately or later, up to 7 days later. Non-allergic responses are toxic effects and pharmacological effects and can also occur immediately or later.
We will review these reactions or responses later as they are characterized by the organ system affected.
| Organ System | Symptoms |
| General | headache, chest pain, fever, fatigue, arthralgia, hot flash, flushing, weakness, watery eyes, and general “strange sensation” |
| Cardiovascular | hypotension, hypertension, vasodilation, ECG changes, chest pain, phlebitis, bradycardia, tachycardia, and A-V nodal rhythm |
| Gastrointestinal | nausea, vomiting, gastrointestinal stress or pain, increased salivation, diarrhea, itching or edema of the tongue, and dry mouth |
| Neurological | headache, paresthesia, tremor, ataxia, dizziness, tinnitus, seizures, and syncope |
| Respiratory | throat irritation, dyspnea, wheezing, and cough |
| Dermatologic | rash, itching, urticaria, erythema, sweating, swelling, and tingling sensations |
| Anaphylactoid | hives, itching, swelling of the airway, and shock |
On this chart, we can see the different organ systems which may be possibly be effected by contrast injections in MRI.
General symptoms include headache, chest pain, fever, fatigue, arthralgia, hot flash, flushing, weakness, watery eyes, general “strange sensation”.
Cardiovascular symptoms include hypotension, hypertension, vasodilation, ECG changes, chest pain, phlebitis, bradycardia, tachycardia and A-V nodal rhythm.
Gastrointestinal symptoms include nausea, vomiting, gastrointestinal stress or pain, increased salivation, diarrhea, itching or edema of the tongue, dry mouth.
Neurological reactions include headache, paresthesia, tremor, ataxia, dizziness, tinnitus, seizures and syncope.
Respiratory reactions include throat irritation, dyspnea, wheezing, and cough.
Dermatologic reactions include rash, itching, urticaria, erythema, and sweating, swelling and tingling sensations.
Anaphylactoid reactions are true allergic reactions and include hives, itching, swelling of the airway, and shock.
Please note, that this chart includes both Allergy symptoms and non-allergic symptoms. All adverse situations are different. Two of the more common symptoms mentioned above are discussed on the next two paragraphs.
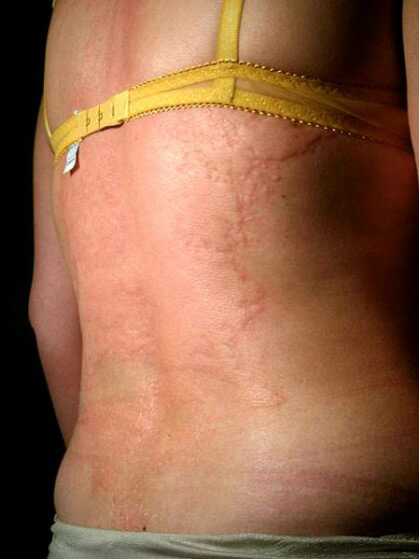
Allergic Reaction: Urticaria
Urticaria is itching of the skin due to redness or hives. If confined to the skin, it is more bothersome than dangerous, but becomes more dangerous if it extends to the eyes, mouth and larynx. It is important to be concerned if the patient expresses a feeling of itching in the mouth and/or throat.
Please note, patients do not have to show symptoms on the skin. The effect can occur in the mucosa tissues in the mouth and throat with no symptoms on the skin.
Allergic Reaction: Quincke’s Edema
Next is Quincke’s edema, or edema of the uvula and is classified as an angioneurotic edema. This can be very serious, because the edema in this area can make it difficult or even impossible for the patient to breath. Complaints of swelling of the face, tongue, lips or eyes, should be taken very seriously.
- Stop the injection
- Assess the seriousness and monitor the patient
- Alert the radiologist
- Contact emergency responders if necessary
- Refer to case management or patients’ physician as needed
If a true reaction, patients should be made aware, and told what symptoms they were having and what medication had been given, so they can notify staff of this reaction in the future.
Nephrogenic Systemic Fibrosis
NSF occurs in patients who have kidneys that are not operating or functioning efficiently. When gadolinium is in the blood stream for longer than recommended, it begins to deposit in the skin and joints. Symptoms of NSF include a fibrous feel to the skin, issues with limited movement of joints, and muscle tissue that becomes striated.
The first case of NSF was documented in 1997, and a link was quickly made to injections of IV contrast in MRI and issues with renal impairment. This disorder can be very serious, if it affects the muscles of the lungs, the diaphragm and the heart.
- Identify patients at risk for NSF by evaluating the serum creatinine and GFR
- Follow manufacturer recommendations with regard to doses of contrast
- Consider another examination
- Discuss the risks and benefits of the injection of contrast if the patient would be at risk, or have the patient consult with the radiologist and/or ordering physician
One last thing to discuss about risks associated with injections of gadolinium is the relationship with multiple MRI exams or MRI exams coupled with radiologic exams with iodinated contrast injections.
As many may know, iodinated contrast can have an adverse effect on the functioning of the kidney, reducing the efficiency of filtration. For this reason, MRI contrast examinations should be done BEFORE tests requiring an injection of iodinated contrast.
If a patient is having 2 MRI examinations, both requiring the injection of Gadolinium, a minimum of 48 hours should separate the two studies.
Risks Associated with Claustrophobia
- Risk of injury: Patients who become anxious or paranoid inside the scanner will attempt to get out of the scanner on their own. This poses risk to injury to the patient
- Interference in exam. Patients may move, breathe heavy, shake, or try to turn their head which may impact image quality. In addition, even if medicated, patients may not follow instructions for successful completion of the study
- We have to consider adverse responses to medication given to sedate patients for the MRI
Sedation, while it helps to eliminate the risk of injury to a patient trying to climb out of the scanner or risk of interference to the examination quality, can pose greater risks.
Antianxiety medications such as lorazepam, valium, and diazepam, as do most medications, carry side effects. Some may be: decreased blood pressure, and slowed or difficulty breathing. In addition, if the patient is “too sedated” they may move or not follow breathing instructions.
In the worst claustrophobic cases, patients will be referred for general anesthesia, like that given for surgery. Being placed under general sedation also has very serious risks. All of these risks must be explained to the patient before a decision is made as to which is best.
Biological Effects
Biological effects are characterized as “odd” effects to human cells or tissue. As a comparison, we know radiofrequencies flip the hydrogen protons, this is not “odd” because that is what we intend to occur.
- Static magnetic field
- Gradients
- Radiofrequency waves
Additionally, these biological effects can manifest in different ways. We will list them here, and then explore them each individually. They are:
Peripheral nerve stimulation – if you have ever experienced this, as I have, it is similar to a feeling a small shock such as from static electricity.
Next is metallic taste, dizziness, cardiovascular effects and magnetophosphenes.
Peripheral Nerve Stimulation
The Peripheral Nerve Stimulation (PNS) is due to sudden variations in the magnetic field. Thus, it will be created during sudden variations of current in the gradient coils.
In fact these current variations will cause the creation of the Eddy currents that could be at the origin of PNS. It should be noted, this sensation often leads to the patient moving or appearing to have moved on the image.
These variations can be measured by dB/dt or the ratio between the amount of change in amplitude of the magnetic field (dB) and the time it takes to make that change (dt). They also depend on the duration of their application.
- Normal mode – dB/dt = 0.8rb (1+0.36/tau)
- First level – dB/dt = 1.0rb (1+0.36/tau)
- Rb = rheobase = 20 T/sec
- Tau = stimulus duration (msec)
The PNS are generally fairly frequent in the rapid sequences and EPI with high flip angles. They are patient dependent…
They are usually not painful but could be behind involuntary movements.
After a certain threshold of dB/dt, it could cause a stimulation that leads to bending the right index. The phenomenon is exaggerated here to allow a better understanding but the PNS are in majority small superficial contractions.
Metallic Taste
Metallic tastes are common with the injection of iodinated contrasts used in radiography. But the magnetic taste and MRI patient may experience has nothing to do with the contrast material, it is caused in MRI by the release of secondary protons to currents induced by the magnetic field variations.
Dizziness
Dizziness may also be experienced. This biological effect can be associated with patients OR any other person in the room. And it can increase in possibility with an increase in field strength.
While gradients play a role, the magnetic field itself can cause this sensation. You may notice this if you walk from the front of the scanner to the back of the scanner, because you pass along a wide range of magnetic strengths along the scanner. Recall, the middle of the scanner will be the true B0, and as we move away from the center, the magnetic field changes slightly.
Why does this occur? The magnetic field has a hydrodynamic effect and the vestibular structures are susceptible to the effect. These are the structures within the inner ear – and the perception of this sensation is transmitted to the brain giving a feeling of dizziness.
Cardiovascular Effects
Magnetodynamics effect on aortic flow. Modern MRI machines have very strong magnetic gradients. These gradients have the potential of inducing an electric field. Recall, a moving current can create a magnetic field and a moving or changing magnetic field can create an electric field. It was Oersted who made that discovery in 1820!!
Because the heart contraction is induced by an electric signal originating in a group of cells called the sinoatrial node or SA node.
While this is possible it is extremely unlikely to occur. And when it does it is most likely not realized by the patient. In simulated studies conducted by the national institute of health, these fields, if created, were not strong enough to induce serious arrhythmias in a healthy body. But it is important to understand that there are electrical currents within the body, when considering the effect the magnets, gradients and RF can have on electrical devices. Extremely rare combinations would all have to take place at an exact moment for this to be a concern.
Magnetophosphenes
The last biological effect to discuss is Magnetophosphenes. Similar to peripheral nerve stimulation, the retina can be susceptible to stimulation as well from the induced currents created during the scanning process. When this happens a small flash of light can be sensed. This can cause the patient to become alarmed or concerned and possibly move during the scan.
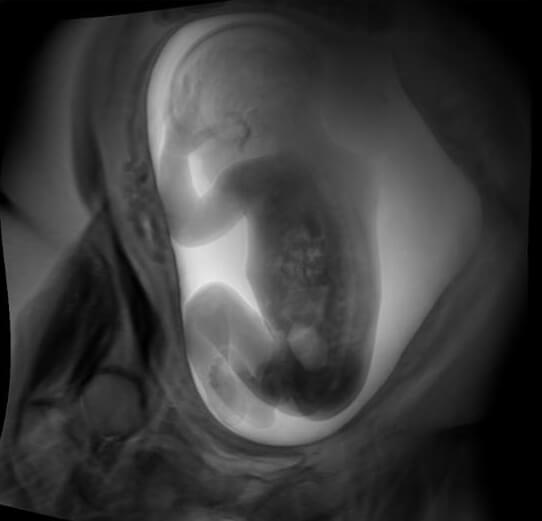
Pregnancy and MRI
An exhaustive study of female MR technologists done in 1990 demonstrated no statistically significant effects on the unborn child. Considerations examined were: spontaneous abortions rates, pre-term delivery rates, and low birth weights. The results of this study led to policies allowing pregnant technologists to continue to work around the magnet and perform MRI examinations. It is recommended that the pregnant MRI technologist NOT remain in the room during the actual MRI examination.
Since the original studies done in 1990, additional research has been done by organizations such as IARC and ICNIRP.
Again, these studies show that no consistent effects of the static magnetic field on the development of the fetus.
There is a very good reason much research has not been done on the effects of radiofrequencies on human examples. With no definitive confirmation of the absence of risk, researchers do not want to expose the unborn child to MRI for research purposes. Therefore, data is collected by survey or follow-up of women who had an MRI while pregnant, but this is not a controlled research study.
Most studies are done on pregnant animals. But these show no recordable abnormalities.
The best we can do, when it comes to pregnant individuals, is follow a few simple policies.
If an MRI examination has to be performed for a pregnant woman, it is necessary to receive her approval after informing her of the demonstrated absence of risk.
In addition, other non-ionizing modalities should be considered before the MRI. Try to avoid exposure to the magnetic field and radiofrequencies during the first trimester (during organogenesis), and avoid gadolinium injections.
As for the pregnant worker, They should avoid being in the room during scanning so as to avoid radiofrequencies and changing magnetic fields caused by the operational gradients.
Changing magnetic fields can be avoided by not walking from the front of the scanner to the back of the scanner when possible.
Conclusion
We have now covered the components of MRI which pose risks, and learned exactly what those risks are. As we have learned, MRI is a very important imaging modality, however it is not without risks.
A technologist or operator of the MRI equipment must be well educated in the presence of contraindications, and side effects of MRI procedures, both those we expect and those we do not expect, and have a full understanding of the precautions to be taken in regards to these risks.
This brings us to the process of establishing risk management, how to identify risks and how to act appropriately in order to reduce injury or worse.
Before we can study the processes of Risk management we first must understand what risk management is and how it will help to identify and prevent potential safety concerns.
It is likely, working in healthcare you have heard this term before. Many hospitals have Risk Management Departments. In addition there are agencies we will discuss shortly that work to identify potential risks and preventions before the consumer or worker is ever exposed to the situation. Risk management is NOT just about MRI, but for our lecture, that will be our focus.
Risk management in MRI is a multi-layered issue. As we have learned in section one there are many risks associated with this examination.
There are concerns with magnetic field, SAR levels, radiofrequencies, contrast media, patients who are claustrophobic, medically implanted devices, and biologic effects to name a few.
In addition, it is not just the patient we have to be concerned about. Family members who accompany the patient, other healthcare personnel and even the staff of the MRI department are of concern.
A simple definition of risk management is the forecasting and evaluation of potential risks along with the identification of procedures or processes to avoid or minimize their impact. In many cases in MRI we want to avoid the impact, as that impact can be potentially be deadly.
Risk management involves a set of processes we will look at more closely in the coming paragraphs. Some of the processes may not be needed when assessing all risks, however all risk management begins with the identification of a potential risk. As an example, a few years ago technologists began to notice metallic artifact with clothing which would normally appear to to be metal free. It was later learned that some companies are using microscopic particles of silver to help eliminate odor and bacteria. As it turns out, this will show up as an artifact on MRI. This prompted concern mostly about the artifact which interfered with the image quality, but it wasn’t long after that reports of MR burns were found to be related to these materials.
Another issue became a concern after technologists started to see advertising for magnetic eye lashes.
It is exposure to these situations, patient questions, or notifications from vendors or MRI related social media that help risks be identified before risks are actually observed.
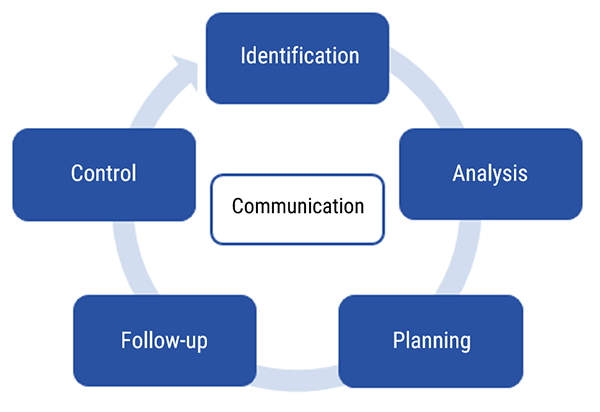
Risk management involves 6 separate processes, let’s look at them.
The Six Stages of Risk Management Process
The next topic discusses the six stages of risk management process. Risk management is part of quality assurance, or what you may know of as QA.
- Identification of the potential problem
- Analysis
- Planning
- Follow-up
- Control
- Communication
Please note, before we go into more detail, there does NOT have to have been an injury, death or even an event to initiate this process, only the POTENTIAL of a hazardous situation.
Identification
Risk identification aims at detecting potential problems before they become real problems and including this information in the project management process. Anyone on the healthcare team can identify a potential risk, but the risk would need to be reported to the designated individual. This individual may be the lead tech, the manager, the MRI safety officer, the radiologist, or even the facility risk management officer. It is important that the correct person be identified and alerted. Identification stage is the first stage in risk management.
Analysis
The next essential step is analysis of the risk. This process involves determining if it was a one-time incident, what actions contributed to the potential risk, were there steps that might have prevented the risky situation and were those steps followed. Analysis is completed using various tools such as surveys, research data, observations and involvement of expert opinions. Analysis can be very simple or it could be very detailed and lengthy.
For example, a technologist does not need to do a detailed research analysis to realize the hair weave the patient is wearing is causing artifact on the scan, or that the patient is feeling a pulling sensation an a prosthetic device they wore into the scanner. It is however, important to document ALL information obtained during analysis, no matter the amount. In this given example, a technologist may just relay the information about the patient’s weave, show an example of the images as part of their analysis.
All information obtained, would become part of the evidence used in the next phase.
Planning
Once this analysis is completed, the next phase is to identify a mitigation strategy for each risk and possibly define the appropriate measures.
Again, using the example of the hair weave: The technologist has reported the evidence to the designated individual. Now that individual would create a plan. This plan may be that all patients be screened to see if they are wearing hair weaves and if they are, they need to remove them prior to going into the scanner.
The mitigation measures will attempt to reduce the probability (or frequency) and the impact of each risk, two of the features that the analysis stage has allowed to determine.
We will review all of the risks discussed in the first section of this two part course in the next topic: Preventative actions and protection. These preventative measures have all come to be during the planning phase of risk management.
Follow-up
The next phase is the follow-up phase of risk management.
The ultimate objective of information resulting from this stage is to be able to make a decision regarding each risk subject of the follow up after the implementation of the plan.
Take for instance the situation mentioned earlier with the sportswear. After the brief analysis it was determined that the clothing posed a risk of interference with the MRI images. The plan was to have all patients change into hospital supplied scrubs regardless of what they were wearing. In the follow-up we would try to determine that the corrective action plan has eliminated or decreased the occurrence of the risk.
Of course the example I use is a very simple issue. As we know, there are potential risks in MRI that can be life threatening. Simple or complex, the process steps remain the same.
Control
Each risk is examined and the collected information, in the Follow Up stage, is reviewed to be able to determine the appropriate measures that should be taken in this concern. The control stage allows for informed decision making because the plan has been tested and re-evaluated during the follow-up.
Communication
Note that at the center of the risk management process is communication.
Not enough can ever be said about the importance of communication in this process. Communication plays a role in all aspects of the risk management process. There is communication of the identified risk, there is communication during analysis, and communication of the intended plan. There is communication of findings during the follow-up and continued communication during the control phase. Communication is key and it is a two-way process.
Communication aims particularly at ensuring a good understanding of risks and available options to limit consequences, which allows making efficient mitigation choices. Which brings us to the next topic: Preventative actions and protections. Let’s move on.
In this next topic we will look at preventative actions and protections that are commonly introduced in MRI facilities because of identification, analysis and planning steps in the risk management process.
Once a potential risk has been identified, the potential cause has been realized and the dangerous effects determined, preventative measures must be created. This is referred to as Process Setup. The process set up is usually determined by one of the managing bodies, who set safety standards or restrictions. Occasionally, an individual imaging center or healthcare facility may create their own policies or rules.
In this section we will discuss various organizations involved in the process setup, and also learn more about some of the preventative actions and protections these organizations have created. We will also learn about preventative measure associated with Magnetic field related risks, radiofrequency related risks, quench related risks and noise related risks.
Process Setup
Here is a list of some of the organizations that play a part in risk management in MRI. The major role of these bodies is to study the effects of electromagnetic rays on health.
ICNIRP: The International Commission on Non-Ionizing Radiation Protection sets standards for exposure to the non-ionizing radiation used in MRI. If you are a radiographer, you have probably heard of the ICRP which sets international standards to the exposure of ionizing radiation. It should be noted, that the United States organizations (OSHA and FDA) do not always follow the international standards, but they are taken into consideration and officials from the United States participate in the ICNIRP.
FDA: The food and drug administration, in the United States, is best known as a federal agency for food and drugs products. However, The FDA sets standards for equipment when it comes to MRI and other modalities because patients are exposed to the effects of the equipment. Standards set by the FDA are primarily followed by the manufacturer of the equipment, and any equipment sold in the US must test to the minimum standards set by the FDA.
ASTM: The American Society for testing and materials is an international organization. Similar to the FDA, the ASTM conducts research on the manufacturing of equipment and the safety to the consumer. Unlike the FDA and OSHA, ASTM makes recommendations which may lead to standards, but does not have the authority to enforce standards. That said, FDA and OSHA may make standards based on findings by the ASTM.
NCBI: The National institute for Biotechnology Information sets standards Because MRI is a BIOtechnical type of equipment, NCBI does a lot of research and makes recommendations. Like the ASTM, NCBI can make recommendations, but not enforce standards.
- Exposure Limit Values INTERNAL. These are not directly measured but based on simulation and calculations, except where related to the static magnetic field
- And Action Values: EXTERNAL. These values are measurable and monitored at the workstation
Two of the primary things the organizations set limits for are occupational exposure to the magnetic field, and patient exposure to the radiofrequencies in relation to the SAR levels.
| Field | Range | Frequency | Duration |
| Static field in bore | 0.2-7 T | 0 Hz | Always present |
| Static fringe field gradient | 1-25 T m-1 | 0 Hz | Always present. Movement within it acts like a time-varying field |
| Imaging gradients | 0-50 mT m-1 | 0-10 kHz | Rise time 0.1 – 1 ms slew rate up to 200 |
| Radiofrequency | 0-50 µT | 8-300 MHz | Few milliseconds duration. Low duty cycle |
Occupational workers in MRI are not exposed to ionizing radiation. They are rarely exposed to the non-ionizing radiofrequencies. For this reason occupational limits apply to exposure to the static magnetic field. The static magnetic field in diagnostic MRI is limited to between 0.2 and 7 Tesla. MOST will be around 1.5T. The ICNIRP limits occupational exposure to a static magnetic field to 2T. But the standard allows for peak exposures of up to 8T in controlled situations. Prolonged exposure to the magnetic field has been found to induce dizziness, nausea, headaches, a metallic taste and visual disturbances.
There have been a number of recent reviews of the biological effects of magnetic fields which have led to the establishment of occupational exposure limits. Exposure guidelines for electromagnetic fields cover the frequency range 0–300 GHz for all aspects of work-related exposure, not just MRI.
| Exposure Limit Values (ELV) relative to health effects | SAR average values measured over a six minute period |
| ELV related to the heating of the whole body expressed in SAR average of the body | 4 W/Kg-1 |
| ELV related to localized heating of the torso and the head expressed in localized SAR of the body | 10 W/Kg-1 Torso 3.2 W/Kg-1 Head |
| ELV related to localized heating of the limbs experssed in localized SAR of the limbs | 10 W/Kg-1 |
This table describes the exposure limit value (ELV) related to health effects for an exposure to electromagnetic fields with frequencies ranging between 100 kHz and 6 GHz as set by the Food and Drug Administration. The International Commission on Non-Ionizing Radiation Protection (ICNIRP) sets these Exposure Limit Values based on relative health risks.
Recall SAR refers to the specific absorption ratio of heat in human tissue. SAR is related to many of the parameters used during an MRI scan. Suffice to say, the faster we scan, the higher the SAR and the more energy we impart into the tissue, the higher the SAR. SAR is measured in watts/kg. It cannot be stressed enough that getting an accurate weight from patients is essential.
The whole body SAR limit is 4 W/Kg. At 4 W/kg, we are in first level mode. Normal mode, which is where we should aim to scan, only goes to 2 W/kg. This is for 6 minutes of continuous scanning.
Whole body SAR limit is usually the SAR value to consider.
2 W/kg is equal to a rise in temperature of about 0.5 degrees Celsius. At 4 W/kg one would see a rise in temperate of 1 degree Celsius. To scan above 4 W/kg should requires IRB approval.
There are localized SAR levels as well. For the head, the limit is 3.2 W/kg over the entire mass with a rise in temperature of 38 degrees Celsius.
The limit for the Torso and extremities is 10 W/kg over any 10 grams with an increase in temperature of about 40 degrees Celsius. The head, torso and extremities should not be scanned in first level.
Reference: The 2013/35/EU instruction.
We will now review most of the different risks associated with MRI, and discuss preventative and protective measures made to protect the worker, the patient and anyone else working or visiting in the area of MRI.
We will review magnetic field, radiofrequencies, SAR, Quench, noise and a few others.
Magnetic Field Related Risks
The MRI unit consists of a very large and very strong magnet. This MRI unit, for example is 1.5 T, thousands of times more powerful than the earth’s magnetic pull.
As seen here, anything made of material attracted to a magnet has the potential of becoming attached to the magnet, or pulled into the magnet. As you can imagine this could be very dangerous. We saw a few videos in the first section which showed just how strong this magnet is.
This is a large object, however something as small as a paperclip has the potential to become a projectile in this environment and can injure someone.
As we have learned in section one, many medically necessary devices have limitations with regard to exposure to the magnetic field and/or the radiofrequencies.
When a patient presents, it is very important to get a list of all medical devices so that their compatibility can be verified. Shedlock’s MRI Safety Manual is updated every year, and should be referred to if information cannot be found through the vendor of the medical device. The FDA requires that all implants be tested and reported on regularly.
The three classifications of devices are MRI safe, which requires no special attention. MRI conditional, which means that the device can only be scanned under certain conditions. And MRI unsafe, which means that it cannot be scanned.
We have also learned that exposure to the magnetic field and/or radiofrequencies may interfere with the functioning of battery or electronically controlled devices. These types of devices will have very specific procedures to follow before, during and after the MRI procedure, IF they are not deemed to be contraindicated.
For an example, a loop recorder is a device implanted inside the patient to measure cardiac information. A patient with a loop recorder would have to go to the doctor, have the information retrieved. They may then have the scan completed – possibly with conditions depending on the scanner and the manufacturer, and then go back to the doctor to have the recorder reset.
It is sufficient to say that any patient with any type of medically implanted device would need to be thoroughly screened beyond the screening all other patients must complete.
The conditional mode of scanning is one of those preventative or protective measures which are the focus of this section of the MRI safety course.
It is the technologist’s responsibility to first try to find the implanted device in the MRI Safety Handbook, or at www.mrisafety.com, or, if needed, contact the manufacturer directly.
In some instances, the risks and benefits must be validated by a multidisciplinary committee; or written authorization may be needed from the manufacturer.
Patients should be permitted to make informed decisions. This means that they should be given the risks, consequences and be told about other possible tests that could be performed without these risks. In most cases, patients would be informed to wait 6 months after implantation to allow scar tissue to form.
Also, be aware that most implants have only been thoroughly tested on 1.5 magnets or lower. And most testing is done on horizontal magnets. This does not mean 3T scanners are unsafe or that vertical magnets are unsafe. It just means that specific testing may not have been done on that particular implant with that particular magnet.
Another consideration with regards to the magnet, are the personal items a patient may have with them.
NO ferromagnetic materials should ever enter areas containing magnetic fields higher than 0.3 T. All people entering the MRI area should be instructed to remove all metal. Not all metal is magnetic, however, when the large magnet in the MRI suite attracts a piece of metal is NOT the time to find out that necklace you are wearing is attracted to a magnet.
MRI suites should have a metal detector to check for metal before a patient enters the room. Better yet, is a Ferrous Detector, which is NOT set off by safe metal, but will indicate there is metal present that will be attracted by the magnet. These devices can be hand held or the doorway could have a detector imbedded to alert of the presence of metal as patients walk through.
- Know how to identify the contraindications through repeated questions to the patient. Don’t just ask the same question over and over, ask the same question in different ways, with different wording, and use both medical terms and laymans terms.
- Identify any and all questionable pertinent information. It is always better to be safe than sorry.
- And, always use equipment which has been determined to be non-magnetic and suitable for MRI. MRI specific equipment is made for almost all situations. There are MRI safe oxygen cylinders, MRI safe EKG machines, MRI safe IV poles, MRI safe wheelchairs, footstools, stretchers and walkers.
When patients come to the MRI department with medical equipment such as a wheelchair or walker, they should be given the MRI safe equipment, and theirs should be moved away from Zones 3 and 4 (more on zones in a bit).
MRI safe equipment should be tested when purchased and marked with MRI safe stickers. And all personnel should be trained to look for that sticker before bringing anything in to the MRI suite.
- Through the secretary when an appointment is taken
- Then by the secretary at the reception
- Then by the operator when he receives the patient in the MRI unit (before accompanying him to the changing room)
- And finally by the operator just before the examination
Systematically search for metal objects while questioning the patient: intraocular foreign metal objects, intracranial vascular clips, stimulators, screws, nails, plates, prostheses, dental appliances…
The patient questioning will also be completed by the details of a contraindications screening form. In case of doubt, perform an X-ray for the skull or the orbit, even a scanner, for patients who are at risk (welders, milling machines operators, metal workers, to search for intraocular foreign metal objects, history of gunshot injury and a history of medically implanted devices.
Here we have initial questions found on an MRI screening form. Note the questions about height and weight. We will discuss their relevance in a bit.
While there is no standardization to screening forms, most ask the same questions.
Note in the example shown here, the patient is asked about a pacemaker AND asked about a defibrillator. While most pacemakers are also defibrillators, many patients refer to it as one or the other and in some cases they may ONLY have a defibrillator. Also, following up with “Have you ever had heart surgery”. You would be surprised how that may prompt the patient to recall some other facts.
| Yes | No | |
| Do you have a pacemaker? | ||
| Do you have an implantable defibrillator? | ||
| Did you ever undergo a heart surgery? | ||
| If yes, what type of surgery? | ||
| Do you have a neurosurgical clip? | ||
| Did you ever undergo a brain surgery? | ||
| If yes, what type of surgery? | ||
| Do you have a nerve stimulant? | ||
| Do you have a hearing aid? | ||
| Do you have a cochlear implant? |
Continuing with the same questionnaire. Note that each device is referenced. Also note the varied ways to attempt to prompt information.
Do you have any vascular endoprosthesis may not mean much to a patient, but following up with Did you ever undergo arteries or veins surgery, may mean something to them, and of course the next question would be asked to ascertain what type of surgery it was.
Note on line 6: Do you have any other prosthesis or implant. Just in case the patient has not identified to any of the other ways they were asked I used to say, do you have anything in or on your body you were not born with?
Lastly on this list, we get to the metal foreign bodies particularly the eyes. Again asked a few different ways. It would not hurt to add your own ways of wording any of these questions if you feel it is necessary.
A final follow-up to these questions could be: “do you have any questions or concerns about any past surgeries or procedures you have had done”.
| Yes | No | |
| Do you have a vascular endoprosthesis? | ||
| Did you ever undergo arteries or veins surgery? | ||
| If yes, what type of surgery? | ||
| Do you have an insulin pump? | ||
| Do you have a dental prosthesis? | ||
| Do you have another prosthesis or implant? | ||
| If yes, what are they? | ||
| Are you susceptible to have a metal fragment in the eye? | ||
| Is there a chance that you have a metal fragment somewhere else in the body (fragment of a missile, bullet…)? |
The final things we ask about are related more to other risks (not the magnetic field risks) but are an important part of a screening. We ask about pregnancy so that we can discuss risks associated pregnancy.
We ask health questions such as kidney failure, organ failure, allergies, etc. to screen patients for the MRI contrast. All in all, the MRI screening process is very important and should be multiple times before the patient is taken into the magnet room, and a few times before even getting to zone 3.
| Yes | No | |
| Do you suffer from kidney failure? | ||
| Do you suffer from respiratory failure? | ||
| Do you suffer from glaucoma? | ||
| Do you have a known allergy? | ||
| If yes, what type of allergy? |
In addition to the screening, which is designed to alert the patient to certain potential risks, there is signage all around the MRI area.
The yellow triangle is a standard sign meaning yield or warning. There are two that need to be posted. One warning of the strong magnetic field and one warning of the radiofrequencies.
Another standard sign is a circle with a line through it, meaning NO. Here we see a heart with a pacemaker, a cigarette, a hip prosthetic, a watch, a cylinder with either oxygen or fire retardant, scissors keys, credit cards.
There is verbiage as well, to give specifics, however most people would not stop to read the specifics, so the image is created to get the attention of those about to enter the area. Adapted pictograms and signboards allow the visualization of risk areas.
Another signage that should be displayed, but is not required in the United States is the Gauss Lines. Some institutions do mark the gauss lines on the floor, but that does not show where the gauss lines are as distance increases from the floor to ceiling.
If not posted as a sign, this should be kept nearby, and the technologist operating the equipment should be familiar with where the gauss lines are. Remember, the closer you are to the magnet, the stronger the magnetic field. The further one is from the 5 gauss line, the less the effect of the magnetic field.
And recall, from section one, every scanner would have its own gauss line map.
The intensity of magnetic fields decreases with distance: increasing the distance between the technologist and the source is a simple and effective protection.
Does this remind you of anything? If you are familiar with Radiography, we talk about distance in relation to the exposure from radiation. This is the same principle. The further one is distanced from the magnetic field, the lower the risk of the magnetic field. It is definitely necessary to only use equipment adapted and compatible with the MRI.
All the medical tools close to the patient’s body (stretchers, wheelchairs, anesthesia material,…) have to be strictly controlled. Non-medical tools (fire extinguishers…) should be tested and marked (i.e. clearly identified as non-magnetic) in advance.
If there are any doubts regarding the ferromagnetic feature of a metal object, it is very easy to perform a test with a small magnet. It is recommended to keep an updated inventory of the equipment that are in the magnet room.
Radiofrequency Related Risks
We have repeatedly talked about the deposition of energy in the form of heat into the tissue during an MRI. As a matter of fact, this was one of the topics earlier in this section used to show how governing agencies set limits for our patients.
Because of this transfer of heat, there are specific risks associated with the application of radiofrequencies.
One of these risks is the possibility of a burn, or specifically an RF burn. These burns can occur when the patient’s skin comes in contact with something that can act as a conductor. Some common pieces of medical equipment are included in this list of conductors: The MRI coil, the MRI bore, Intravenous tubing, and heart monitoring wires. Even damp area between the fold of the patients skin can be blamed for RF burns.
The patient’s skin should never be in direct contact with these things. For the coil and other medical equipment, a folded sheet or towel may be enough padding. However for the inside of the bore, it is recommended to separate the patient from the bore with a minimum of 10mm of padding.
Earlier we talked about SAR limits. The MRI machine calculates the SAR for each sequence based on the weight and height of the patient, which the operator is responsible for entering when registering the patient. Hence, it is important not to under or overestimate the weight and eventually the height of the patient. Recall a few paragraphs ago, we saw these questions on the MRI screening form.
There is a maximum limit of 1 to 2 W/kg in normal mode scanning, which provides a wide margin of safety.
First level mode scanning, as we have learned is 4 W/kg. These limits are based on 6 minutes of continued scanning. These numbers represent whole body SAR limits. There are localized limits for the Head, Torso and Extremities. Please go back and review these as needed.
As mentioned, there are multiple agencies involved in setting limitations for MRI scanning protocols. The Food and Drug Administration (FDA) defines limits to SAR values, similar to the ICNIRP chart we looked at earlier.
According to the FDA the whole body SAR limit is 4 W/kg for 15 minutes of total scan time. What is not different is that 4W/kg is still considered first level mode scanning. Normal mode is always 2 W/kg. Additionally, the FDA allows maximum of 3W/kg for 10 minutes of scanning with regard to the head and the 12 W/kg for 5 minutes for the extremities. The FDA does not define a SAR limit for Torso that would fall under whole body scanning.
As mentioned earlier in this section, there are different parameters that can be used to control SAR, but also, can increase SAR if not used properly. These parameters are TR, TE, Flip Angle and ETL.
Preventive Actions
For occupational workers: there are no real risks associated to the RF energy because we are not inside the room during RF transmission. But there is still a possibility. Recall the exposure limits set are not just for the MRI unit but for all electromagnetic fields we are exposed to in the workplace.
When exposure to electromagnetic fields exceeds the action limit values, different preventive actions must be applied: reduction of field intensity, collective protection measures, reduction of fast movements around the machine, Personal protection, zoning of workspaces, and prevention of indirect effects. Employees must be informed of the exposure situations at their workplace.
Exposure Time
Here we have another preventative technique that reminds us of radiation protection. Time. The least risk is associated with the shortest time period of exposure to the electromagnetic field.
For frequencies below 100 kHz, no cumulative effect for exposures that respect the electrical stimulation and thermal thresholds for tissue damage. Consequently, reducing the exposure time is not a preventive solution as long as the limit values are respected.
However, for radiofrequencies above 100 kHz, the actual exposure duration should be taken into account for each 6-minute period.
Field Intensity Reduction
There are some limited ways that field intensity can be reduced or minimized to occupational workers. While workers are not routinely exposed to the RF frequencies, there are limits to how much exposure to electromagnetic fields, workers can be exposed to.
Generally, workers are outside the room during scanning. However, at times a patient may need someone to be in the room and a technologist is the only person available. Or, when equipment isn’t working properly a technologist might volunteer to be scanned to test the equipment. These events should be kept to a minimum.
As far as when in the control room, there should be no RF escaping the room. This is checked and inspected routinely. Technologists should report any notice of the coil strips being missing from the door seal. It is quite likely, that RF interference as an artifact will be noticed long before exposure limits would be reached in the control room.
Quench
A quench involves the escape of helium in the gaseous form. The quick exhaust of helium implies a warming of the coil. The coil become resistive, the current flowing over the field stops.
A quench can occur one of two ways. Either spontaneously when the system malfunctions or when initiated by the technologist or other MRI worker.
There is little we can do to prevent a malfunction, but it is important to check temperatures and helium levels regularly. Also, monitoring oxygen levels in the scan room will alert of a potential slow leak. We know that as helium levels in the air increase, oxygen levels decrease.
An initiated quench should ONLY happen when there is a great risk to a patient or other worker, or in case of a fire, so that firefighters can safely come in to the area to fight the fire. An example of risk to a patient or coworker would be someone trapped against the magnet by a ferrous object.
In the event of a Quench, the room should be evacuated as quickly as possible as well as the associated area.
Once everyone is out, the door should be closed and sealed, to contain the helium and protect oxygen levels in the rest of the area.
If possible the ventilation in the scan room should be increased to remove as much of the helium to the outside as possible. Some departments have a large ventilation system or exhaust fan only used in the event of a quench.
The next step would be to contact the manufacturer to schedule service. They will need to determine why the quench occurred (if it wasn’t technologist induced) and will need to prepare to revamp the scanner. This is a very expensive and very time consuming process, which is why we do not initiate a quench unless it’s a matter of life and death.
Keep in mind, There is also a risk of the room containment: the overpressure induced by the serious helium leakage might make impossible to open the door if the door opening is towards the examination room.
Noise Related Risks
The next risk to review is Noise. OSHA says that anyone exposed to noise over 85 dB, need hearing protection. The MRI scanner gradients operate at about 100-110 dB. Hearing protection is not optional.
Because workers are outside the sealed room, they are not exposed to the same volume as those in the room. However, technologists should have the volume turned off on the speaker which allows them to hear patients in the room during scanning, and only turn it up between scans when checking on the patient.
There are many different types of hearing protection. Common ones are earplugs or earmuffs.
Some facilities have special headsets attached to music or in ear, earbuds hooked up to music.
Any of these are acceptable forms of hearing protection.
- The patient
- Family members accompanying the patient
- Staff members who remain in the room
- And even Service animals
Remember that animals have hearing that is far more sensitive than humans, it is probably best to keep them out of the room if possible since hearing protection is usually made to fit humans.
Review of Other Risks
We have now covered the more common areas of risks associated with MRI, the Magnet and the Radiofrequencies, and their preventative actions and protections.
We will now review other risks involved.
These include contrast media risks, claustrophobia risks, biological risks, ambient electric field risks and we will also review the 4 zones of MRI which is the first defense for MOST risks associated with MRI.
There are several risks associated with contrast injections. They may involve the injection itself, the contrast media or the effects the contrast has in patients with certain health conditions.
Risks associated with claustrophobia include potential injury or risks associated with sedation.
The risks associated with Peripheral nerve stimulation and ambient electric field are minor, and usually involve sensations to the patient.
Contrast Media Risk Prevention and Protection
The greatest risks surrounding contrast injections are the possibility of adverse reaction, risks associated with intravenous injections and the risks of NSF (nephrogenic systemic fibrosis).
We can best assess patient risks for sensitivity to contrast is to thoroughly screen them for past reactions or issues with MRI contrast and determine allergy history.
NSF risk can be evaluated by screening patients for risk potential and assess kidney function using a simple blood test for BUN, Creatinine and eGFR.
Risks associated with the IV itself require the technologist to ensure sterility of the equipment and good medical asepsis practices when starting the IV to reduce the chance of infection. Once the IV is in place, the integrity of the site should be tested with an injection of saline and careful observation during the injection of the contrast.
Claustrophobia Risk Prevention and Protection
Again, screening will help to determine if the patient could be claustrophobic. Most patients will tell you, but sometimes pride interferes. Assess your patient. Look for nervousness, sweating, and other odd behaviors such as pacing, staring at the MRI unit, agitation and possibly anger.
Patients who are identified ahead of appointment time can be referred to their doctor for medications to relax them.
These medications, however, come with their own risks. Patients who are too sedated may move during the scan, not follow directions for breathing or stillness, and also are at risk for decreased respirations and/or heart rate. No special monitoring equipment is needed, however it is good to check on the patients often.
Biologic Effect Risks Prevention and Protection
Peripheral nerve stimulation does not pose a great risk to patients, however, it can interfere with the image quality as it shows as motion. It can also be startling to patients.
The best way to prevent or reduce the effect of peripheral nerve stimulation is to make sure the patient skin is not in contact with another part of the anatomy. A common place to feel this is in the hands if the fingers are clasped and overlapped. Make sure the patient does not lock fingers during the scan.
Ambient Electric Field
The main risks associated with ambient electric fields in the workplace are indirect, i.e. contact currents and spark discharges from objects or persons charged by the field.
For this reason potential explosives should never be in or around the scanner when in operation. Lighter and other compressed containers should be kept out of the room.
Oxygen tanks (even MRI safe ones) should be kept as far away from the scanner as possible. These risks are very rarely seen happen, but one doesn’t want to be around when it does.
This brings us to the MRI zones. MRI zones were set up as a result of risk management planning processes. MRI zones are one of the most common standardized method utilized in MRI and probably the most effective at controlling the majority of risks associated with MRI.
Definition of Identification of Zones
The American College of Radiology has defined four safety zones within MRI facilities. These are denoted Zones I through IV and correspond to levels of increasing magnetic field exposure (and hence potential safety concern). While the exact location of each zone will vary greatly from facility to facility and will also depend on what common areas are shared with other modalities, a basic diagram would be:
Zone I: All areas freely accessible to the general public without supervision. Anyone can be in this zone. A waiting room shared with other departments would be considered Zone I. There is no screening required to be in Zone I.
Zone II: Still a public area, but the interface between unregulated Zone I and the strictly controlled Zones III and IV. MR safety screening typically occurs here and persons should not be permitted to enter this zone without being accompanied by an employee. Family who is not screened is permitted to come along to help with the screening and dressing process as long as they are accompanied by an employee.
Zone III: An area near the magnet room where the fringe, gradient, or RF magnetic fields are sufficiently strong to present a physical hazard to unscreened patients and personnel, therefore, ONLY SCREENED persons are permitted in Zone III and must be accompanied by a worker who is trained in MRI safety. Family members may accompany to Zone III but must be screened. Also, no one should enter Zone III with any potential projectiles.
Zone IV: Synonymous with the MR magnet room itself. It has the highest field (and greatest risk) and from which all ferromagnetic objects must be excluded. No one is permitted in this area until officially CLEARED. Clearance is a step beyond screening. Screening can reveal details that need cleared. Clearance is the last step in the screening process and must be completed before allowing entry into Zone IV.
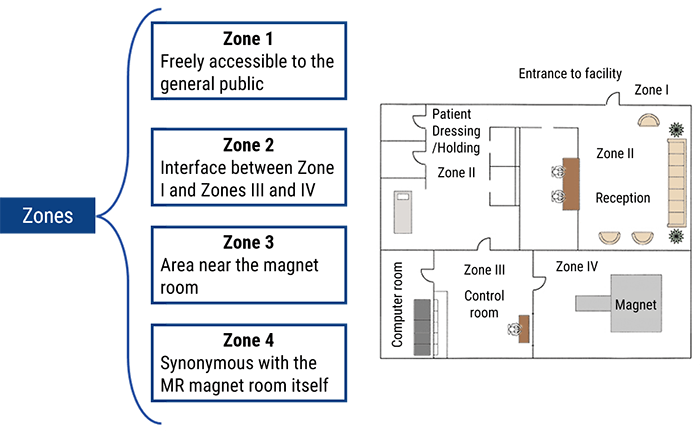
Clearance by Zone
- Zone One requires no screening. This is an area where the general public is permitted to be. While most MRI patients in Zone One have had a phone screening, it is not required
- Zone Two is where the screening will take place. Patients for MRI may have been given the screening form in Zone one, it is reviewed and confirmed verbally in zone Two
- Zone Three: No one who has not been screened is permitted in Zone Three due to the close proximaty to the MRI scanner. The technologist will screen the patients one more time in Zone three before clearing them to go into Zone 4
- Zone 4: only people cleared to enter Zone 4 may enter. Clearance is the final step in the screening process
Risks Associated with Zone Infractions
Risks of zone infractions are great. Imagine a patient who is nervous about having the MRI wants her husband to come back while she gets on the table. He says he will wait by the door only. While the technologist is getting the patient on the table, herhusband gets nervous and comes running in the room. He was never screened and he has a pacemaker! This is a huge liability.
Imagine a sales person for one of the vendors comes to your department. The receptionist tells him to come back, she recognizes him and thinks it is ok. While looking for you, he notices you in the scan room and comes into the room to talk to you, his clipboard, tie tac and a pen fly across the room towards the scanner where you are standing, striking you in the head with the force of 500 psi. This is a real possibility.
MRI accidents happen all the time. Most of them happen due to Zone Infractions, whether it be people or things that should not have crossed a zone.
In our last part of section two, we are going to discuss worker information and training. It is the responsibility of the employer to ensure all staff working in and around MRI equipment know the risks and are properly trained in MRI safety.
Being trained in MRI safety is not the same as MR Safety officer training which is much more intense. We will discuss that as well.
Work-Related Preventive Actions
It is the responsibility of the employee to inform supervisors of implants or other potential risks associated with themselves. Depending on their job function, specific accommodations would be made.
Obviously this would be different for the MRI technologist or Radiologist than it would be for a worker in housekeeping who just needs to empty trashcans or clean certain areas. A housekeeper could be told they cannot enter Zone 3 or 4. An MRI tech cannot do their job if they do not enter Zone 3 or 4.
If an employee with an implant from another department had to visit MRI and had an exposure to the fringe field, it would have to be reported. That said, with proper screening processes in place, this should not happen.
- Measures taken in application of this directive
- The values and concepts of the ELVs and ALs, the associated possible risks and the preventive measures taken
- The possible indirect effects of exposure
- The results of the assessment, measurement or calculations of the levels of exposure to electromagnetic fields
- How to detect adverse health effects of exposure and how to report them
- The possibility of transient symptoms and sensations related to effects in the central or peripheral nervous system
- The circumstances in which workers are entitled to health surveillance
- Safe working practices to minimize risks resulting from exposure
- Workers at particular risk
If any undesired or unexpected health effect is reported by a worker, or in any event where exposure above the ELVs is detected, the employer shall ensure that appropriate medical examinations or individual health surveillance is provided to the worker(s) concerned, in accordance with national law and practice.
Such examinations or surveillance shall be made available during hours chosen by the worker, and any costs arising shall not be the responsibility of the worker.
Employers shall provide reasonable accommodations for employees who have risks associated with protected disabilities. The assessment of a potential risk with an employee should be discussed with the employees physician.
What is a reasonable accommodation? That varies from employer to employer. For example, an employer who has only one technologist working a shift, would not be required to hire a second technologist because the first one has an implanted defibrilator.
If compliance with the ELVs cannot be reliably determined on the basis of accessible information, the assessment of the exposure shall be carried out on the basis of measurements or calculations. In such a case, the assessment shall take into account uncertainties concerning the measurements or calculations, such as numerical errors, source modelling, phantom geometry and the electrical properties of tissues and materials, determined in accordance with relevant good practice.
We discussed the process of risk analysis earlier in this section, from a larger perspective.
Within an imaging department or MRI Imaging facility, the employer has certain responsibilty as well with regards to risk evaluation. There are 10 essential aspects to risk evaluation in the work setting.
First, the person or persons responsible for risk evaluation must have an understanding of the electromagnetic fields. Next, there has to be familiarity and understanding of the exposure limit values and acoustic limits.
In addition the results of the evaluations of exposure must be analyzed and assessed. Next, the person or persons responsible must keep up to date on new information about the emission levels of electromagnetic fields.
The 5th aspect to understand is the frequency, level and duration of exposure found within that particular department or facility based on the protocols being utilized.
Next, what biophysical effects are the workers in this facility exposed to, and what, if any, impact will these effects have on the workers, especially pregnant workers and the unborn child?
Next, physicists should routinely provide information to the responsible parties – ACR requires yearly reports. Some states may be more often.
Next – what equipment or precautions are being used or are needed to reduce the level of exposure to the magnetic field.
And lastly, is there any exposure to simultaneous frequency fields and how does that effect personnel?
Some steps that we can take as individual technologists are outline here:
You may recall the principles of radiation protection if you are a radiographer. Time, distance and shielding. The steps we take in MRI to protect ourselves are similar.
Reduce or minimize the amount of time spent in the room during RF transmission.
Increase distance from the center of the magnet – the strongest area of magnetism, especially around stronger magnets at the 3Tesla level.
Pay close attention when others are in the area, such as cleaning personnel, other healthcare providers, sales personnel and vendor representatives – making sure anyone in the area of the magnet do not havenon-compatible pacemakers, aneurysm clips or valves. Make sure they are not carrying other non-compatible devices and of course they are not carrying ferrous objects. Remember, ANYONE in zone 3 needs to be cleared EVERY time they come to the area. Never assume because someone works for a vendor company, they are cleared to be in the area. In most cases, a verbal screening can be done. And never assume that someone who was cleared 6 months ago is still cleared.
As workers in and around a magnetic field, it is important to know what types of examinations would lead to possible exceeding the exposure limit values in MRI.
Highest risk is associated with examinations requiring personnel be in the room during scanning, such as guide wire placement and other interventional procedures. Additionally, functional MRI and research MRI often present higher risks. Recall, most ELV’s are based on 1.5 or 3T scanners, research involved up to 10T scanners.
Procedures of Medium risk of exceeding ELV’s are sitting in the room with a claustrophobic patient or pediatric patient as this usually involved sitting within 1 meter of the scanner. In addition, getting into the scanner to clean the inside of the bore or look for a ferrous object that was attracted. Some tests pose a medium risk to patients, including patients under general anesthesia and certain function testing.
Routine scans with no employee or accompanying family member, biopsies when the patient is not in scanner for the entire procedure and technologists administering contrast while no scanning is going on, pose very low risks to exceeding ELV’s.
There are special provisions for those working with magnetic field strengths of 8T or higher. These field strengths are found mostly in research applications.
- Justifies work applications
- Requests an occupational health physician’s opinion
- Sets protection measures ensuring:
- Workers are protected from harmful effects with regard to health and safety risks
- A temporary exposure
- No medical contraindications
- An authorization to enter the workstation
MR Safety Officer Training
In recent years, there is a great demand for persons trained in MRI safety and certified by the American Board of Magnetic Resonance Safety (the ABMRS). To date, ARRT does not have a specialty certification for this. Additionally, it is not required at this time that a facility has an MRSO (MR Safety officer) on site.
Currently there are a few renowned programs in the United States to provide the training to prepare MR techs for the MRSO certification. It is expected in the coming years it will be a requirement, just as a Radiation Safety Officer is required when Ionizing Radiation is produced.
While an individual may be listed as the MR safety officer, here we refer to a certified MRSO.
Wow!! Did we cover a lot of material?
Let’s summarize what we have learned.
We know that MRI is a safe medical examination under the right condition, but it is not without its risks. The greatest risks are associated with the strong magnetic field and the introduction of the RF energy.
It is essential to be aware of all possible contraindications and side effects associated with all aspects of the MRI procedure.
By establishing a risk management process and stressing the importance of communication in that process, most risks can be identified before they cause injury or death.
There are 6 steps in the risk assessment process. They are identification, Analysis, planning, follow-up and control and communication.
This process leads to prevention and protection policies being created to minimize future risks.
Safety rules and policies help to define the training required of all people working near the MRI area, or having the potential to work in that area.
Establishing good practices such as the screening forms and procedures, protocol for dealing with patients with a sensitivity to contrast media, help to minimize risks and make the entire process safer for everyone involved.
Zones help to regulate who has access to various areas of the MRI department and probably one of the most important aspects of Prevention and protection of MRI risks.
Now that you have completed this course, you are ready to take your post-test. Please proceed to the post-test where you will find additional instructions.
Post-Test & CE Certificate:
Add to CartPrice: $15.00
| ✔ | Approved by the CAMRT (Canadian Association of Medical Radiation Technologists) for 5 Category A CE Credits |
| ✔ | License duration: 6 months from purchase date |
| ✔ | Meets the CE requirements of the following states: California, Texas, Florida, Kentucky, Massachusetts, and New Mexico |
| ✔ | Accepted by the American Registry of Magnetic Resonance Imaging Technologists (ARMRIT) |
| ✔ | Meets the ARRT® CE reporting requirements |
As per the ARRT regulations, you have up to 3 attempts to pass the Post-Test with a minimum score of 75%.
Upon the successful completion of the Post-Test (score 75% or more), you will need to fill up a 1 min survey and then you will be able to issue your CE Certificate immediately.
Refund Policy: Non-Refundable
